Tuesday, July 28, 2026

VERCEL DEPLOYMENT


Hobby (Free) Plan

You can have up to 200 projects (websites/apps) under one account. Each project can have its own:

  • Production deployment
  • Preview deployments
  • Custom domain (optional)
  • GitHub repository or folder in a monorepo

Other important Hobby limits include:

  • 100 deployments per day
  • 1 concurrent build
  • 45 minutes maximum build time per deployment

Pro Plan ($20/month)

  • Unlimited projects
  • 6,000 deployments per day
  • Faster builds and more resources

Enterprise Plan

  • Unlimited projects with custom enterprise limits and additional collaboration and security features.

For your use case

Since you've been building multiple React/Vite projects such as:

  • Galaxy EduCore Portal
  • CCYI Global Academy
  • Library Management System
  • Staff Training Portal
  • Other CCYI websites

you can comfortably host all of them on a single free Vercel Hobby account, provided you stay within the usage limits. You have room for up to 200 separate projects, which is far more than most individual developers need.

If your goal is to host many client websites, you can either:

  • Create one Vercel account and manage up to 200 projects (Hobby), or
  • Upgrade to Pro when you need unlimited projects, team collaboration, or higher deployment limits.

Given the number of educational and business projects you're planning, a single Vercel account should be sufficient for quite a while before you'd need to upgrade.

what steps can i take to deploy on vercel

Since you're already using React, Vite, GitHub, and VS Code, deploying to Vercel is straightforward. Vercel automatically detects Vite projects and configures the build settings in most cases.

Option 1: Deploy from GitHub (Recommended)

Step 1: Push your project to GitHub

Open VS Code and run:

git init
git add .
git commit -m "Initial commit"
git branch -M main
git remote add origin https://github.com/YOUR_USERNAME/YOUR_REPOSITORY.git
git push -u origin main

Or use the Source Control panel in VS Code.

Step 2: Sign in to Vercel

  1. Go to https://vercel.com
  2. Click Continue with GitHub
  3. Authorize Vercel to access your GitHub account.

Step 3: Import your project

  1. Click Add New Project
  2. Select your GitHub repository.
  3. Click Import.

Vercel usually detects that it is a Vite/React project automatically.

Step 4: Verify the build settings

Normally these are filled in automatically:

SettingValue
FrameworkVite
Build Commandnpm run build
Output Directorydist
Install Commandnpm install

Step 5: Deploy

Click Deploy.

Within about a minute, you'll receive a URL such as:

https://your-project.vercel.app

Option 2: Deploy from VS Code using the Vercel CLI

Install the CLI:

npm install -g vercel

Login:

vercel login

Move into your project folder:

cd your-project

Deploy:

vercel

For a production deployment:

vercel --prod

The CLI will guide you through linking the project and deploying it.

Every time you update your website

If your project is connected to GitHub:

git add .
git commit -m "Updated homepage"
git push

Vercel will automatically build and deploy the latest version. Every push to your production branch creates a new production deployment, while other branches can generate preview deployments.

Add your own domain (Optional)

After deployment:

  1. Open your project in Vercel.
  2. Go to Settings → Domains.
  3. Add your custom domain (for example, ccyiglobal.org).
  4. Update your DNS records as instructed by Vercel.

Common deployment errors

If deployment fails, check for:

  • Missing package.json
  • Build errors (npm run build should work locally)
  • Incorrect import paths
  • Missing environment variables (.env)
  • Wrong output folder (should be dist for Vite)

I can also help you deploy your projects

Based on what we've worked on together, I can walk you through deploying any of these:

  • ✅ Galaxy EduCore Portal
  • ✅ CCYI Global Academy
  • ✅ CCYI Library Management System
  • ✅ Covenant University Staff Training Portal
  • ✅ Any React/Vite project

If you share your GitHub repository (or the project folder), I'll guide you through the deployment and help resolve any build errors until the site is live.

Wednesday, July 22, 2026

Creating a Two-Column Food Menu Using Bootstrap and Viewing it in the Browser Lab


Instructions

Creating a Two-Column Food Menu Using Bootstrap and Viewing it in the Browser Lab

Introduction:

In this lab, you will build a responsive two-column food menu for Little Lemon using the Bootstrap Grid system. You'll display the Little Lemon logo and arrange menu items into two columns.

Goal:

The goal of this lab is to build a responsive, visually appealing webpage for Little Lemon that showcases a two-column food menu. This will be achieved by using the Bootstrap Grid system to create a structured layout with a centered logo, menu title, and organized menu items.

Objectives:

  • Set up a responsive webpage using the Bootstrap Grid system.

  • Utilize Bootstrap classes to create a structured container with rows and columns.

  • Center-align elements such as images and text using Bootstrap utility classes.

  • Build a two-column layout for menu items that adapts to various screen sizes.

  • Apply responsive design principles with Bootstrap classes like col-12 and col-lg-6.

Instructions:

Part 1: Creating a Two-Column Food Menu Using Bootstrap:

Step 1: Set up the bootstrap container.

  • Open the index.html file present under the PROJECT folder.

  • Locate the <body> tag in the file. Add a <div> inside the <body> element with the class container. This will be the main Bootstrap container for the page content.

Step 2: Add rows to the container.
  • Inside the container <div>, add three <div> elements, each with the class row

    • The first row will hold the Little Lemon logo.

    • The second row will hold the menu title.

    • The third row will hold the two-column food menu.


Step 3: Add the logo to the first row.
  • Inside the first row <div>, add a child <div> with the class col-12. This will make the logo span across the entire row.

  • Add another <div> inside the col-12 <div> with the class text-center to center-align the logo.

  • Add an <img> tag inside the text-center <div>.

    • Use src="logo.png" to refer to the logo image.

    • Add the img-fluid class to make the logo responsive.


Step 4: Add the menu title to the second row.
  • Inside the second row <div>, add a child <div> with the class col-12.

  • Add another <div> inside this col-12 <div> with the class text-center to center-align the title.

  • Add an <h1> tag inside the text-center <div> with the text Our Menu.


Step 5: Add two columns to the final row.
  • Inside the third row <div>, add two child <div> elements:

    • Each <div> should have the class col-12 col-lg-6.

    • These classes make the columns stack vertically on smaller screens and display side-by-side on larger screens.


Step 6: Add menu Items to the columns.
  • In the first col-12 col-lg-6 <div>, add:

    • An <h2> tag with the text Falafel.

    • A <p> tag with the text Chickpea, herbs, spices.

    • An <h2> tag with the text Fried Calamari.

    • A <p> tag with the text Squid, buttermilk.

  • In the second col-12 col-lg-6 <div>, add:

    • An <h2> tag with the text Pasta Salad.

    • A <p> tag with the text Lettuce, vegetables, mozzarella.

    • An <h2> tag with the text Greek Salad.

    • A <p> tag with the text Cucumbers, onion, feta cheese.


Step 7: After successfully modifying the index.html file, navigate to File > Save to save changes in the file.

Part 2: Viewing Your HTML Document in the Browser:

Step 1: Start the live server.

  • At the bottom-right of the editor, click on the Go Live button.

  • Once the server is up and running, you will see an exposed port number (e.g., 5500). This means your server is now live.

Step 2: Open the browser preview: At the middle-left of the editor, click on the Browser Preview button to open a new Browser Preview tab.

Step 3: Enter the URL in the browser: In the browser, enter the following URL format (replacing <exposed port> with the actual port number shown in the editor): http://localhost:<exposed port>.

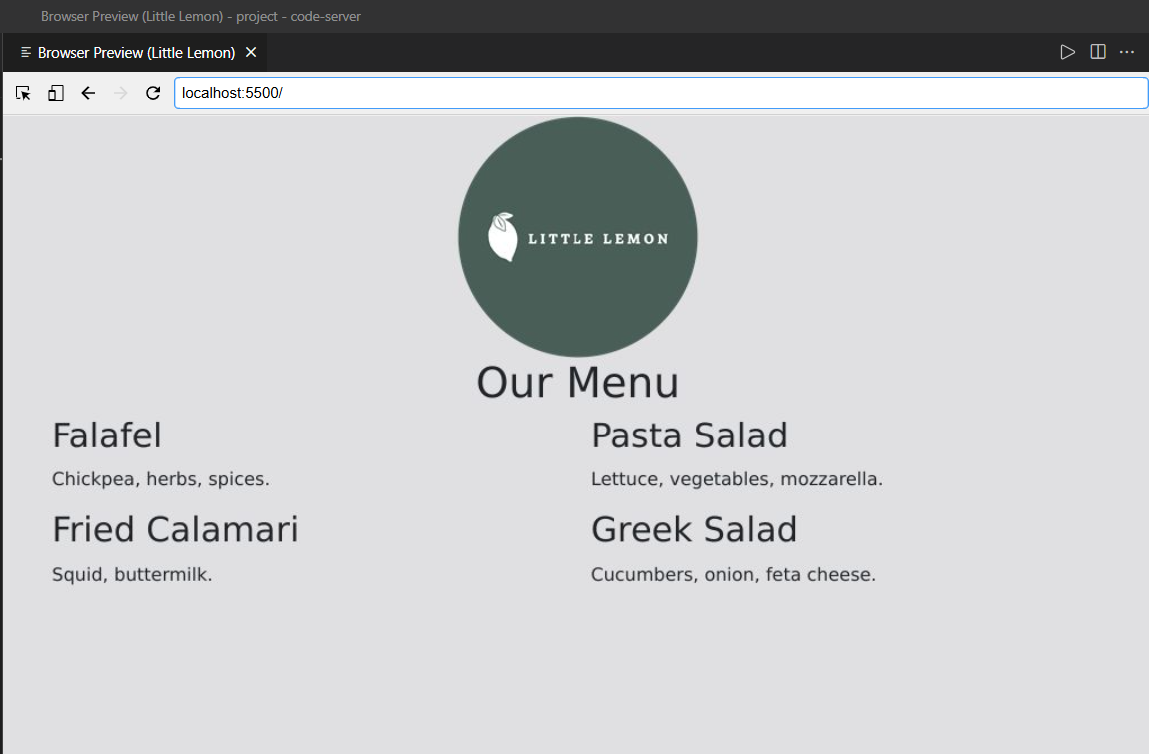
Step 4: Check that the web page displays: Once the URL is entered correctly, the webpage will load, and you should see the Little Lemon menu webpage based on the layout that you have defined in the index.html file.

Step 5: Close the server after completing the lab: Once you’re done with the lab, make sure to close the server to free up the port:

  • Click on the exposed port number (e.g., 5500) at the bottom-right of VSCode.

  • You should see a notification confirming that the server is now offline (stopped).

Final Output:

Note for Learners:

When using the browser preview functionality in the machine environment, the webpage layout may initially appear with both columns stacked vertically, each taking up the full width (using the col-12 class). This is because the browser preview defaults to a smaller screen size (mobile view), which applies the col-12 class to each column, making them stack on top of each other.

However, if you want to see the two columns side by side (with each column taking up 50% of the width on large screens), you can expand the screen size of the browser preview panel. This will trigger the col-lg-6 class, which adjusts the layout to show the columns side by side on larger screens.

Key Takeaways:

  • Use the Bootstrap Grid system to create responsive layouts.

  • Center-align content using utility classes like text-center.

  • Make images responsive with the img-fluid class.

  • Understand how classes like col-12 and col-lg-6 help create adaptable designs.

Final Step: Mark as Completed

  • Click the Mark as Completed button present below to mark the lab as Completed.


Digital Credential & Academic Achievement Platform.

 Excellent. This is where your platform starts becoming more than an LMS. It becomes a Digital Credential & Academic Achievement Platform.

Since you're building Galaxy EduCore ERP + LMS, I recommend building this in stages so each part is reusable and integrates with Moodle, Firebase, and your admin dashboard.

Phase 1: Database Design (Firebase)

Create a certificates collection.

Example document:

{
  certificateId: "GEC-2026-000001",

  studentId: "STU001",

  studentName: "Kay Daniels",

  studentEmail: "student@covenantuniversity.edu.ng",

  courseId: "CSC112",

  courseName: "HTML & CSS Fundamentals",

  instructor: "Dr. John Doe",

  issuedOn: "2026-07-22",

  completedOn: "2026-07-20",

  expiryDate: null,

  grade: "A",

  score: 96,

  duration: "8 Weeks",

  status: "Issued",

  verificationCode: "84JSHD9928",

  qrCode: "",

  certificateUrl: "",

  template: "default",

  downloads: 0
}

Phase 2: Admin Certificate Generator

Create

src/admin/certificates/

Inside:

Certificates.jsx
CertificateGenerator.jsx
CertificateTemplate.jsx
CertificateTable.jsx
IssueCertificate.jsx
VerifyCertificate.jsx

The admin should be able to

  • Search student
  • Select course
  • Select template
  • Select instructor
  • Enter grade
  • Enter score
  • Click
Issue Certificate

Automatically create

  • Certificate ID
  • Verification Code
  • QR Code
  • PDF
  • Firestore record

Phase 3: Student Certificate Portal

Instead of static cards, load certificates from Firebase.

Example:

My Certificates

✓ HTML & CSS Fundamentals

Issued:
15 July 2026

Grade:
A

Score:
95%

Download PDF

Verify

Share

Phase 4: Beautiful Certificate Templates

Create

src/components/certificates/
CertificateClassic.jsx

CertificateModern.jsx

CertificateGold.jsx

CertificateBlue.jsx

CertificatePremium.jsx

Example layout

########################################################

           GALAXY EDUCORE

        CERTIFICATE OF COMPLETION

This certifies that

        KAY DANIELS

has successfully completed

HTML & CSS Fundamentals

with distinction.

Instructor

John Doe

Issued

22 July 2026

Certificate ID

GEC-2026-00045

########################################################

Phase 5: PDF Generator

Use

jspdf

Install

npm install jspdf html2canvas

Generate

certificate.pdf

when

Download

is clicked.


Phase 6: QR Code

Install

npm install react-qr-code

Every certificate receives

https://galaxyeducore.com/verify/GEC-2026-00045

QR Code

███████████
██ ▄▄▄ ██
██ ███ ██
██▄▄▄▄▄██
███████████

Anyone scanning it can verify authenticity.


Phase 7: Verification Page

Create

pages/VerifyCertificate.jsx

Users enter

Certificate ID

or

Scan QR Code

Display

✓ VALID CERTIFICATE

Student

Kay Daniels

Course

Python Programming

Issued

22 July 2026

Grade

A

Certificate ID

GEC-2026-00045

Phase 8: Automatic Certificate Issuing

This is where it becomes powerful.

When Moodle reports:

Course Progress = 100%

AND

Quiz Passed

Automatically

Generate Certificate

↓

Create PDF

↓

Upload to Firebase Storage

↓

Create Firestore Record

↓

Generate QR Code

↓

Send Email

↓

Show inside Student Dashboard

No administrator intervention required.


Phase 9: Email Certificate

When issued

Student receives

Subject:

Congratulations!

Dear Kay Daniels,

You have successfully completed

Python Programming.

Your certificate is attached.

Download Online

Verify Online

Regards,

Galaxy EduCore

Phase 10: Admin Analytics

Dashboard

Certificates Issued

2,584

Today's Certificates

45

Downloads

7,524

Verification Requests

912

Most Completed Course

HTML & CSS

Top Instructor

Dr. James

Recent Certificates

-------------
Kay Daniels
Python

Sarah James
Java

Paul John
AI

Phase 11: Achievement Badges

Alongside certificates, award digital badges that students can collect and display on their profiles.

Examples:

  • 🥇 Course Completion
  • ⭐ Top Performer
  • 🚀 Fast Learner
  • 💡 Innovation Award
  • 👨‍💻 Coding Champion
  • 📚 Academic Excellence

These can appear in the student's dashboard and be tied to milestones or performance.


Recommended Build Order

To keep the project manageable, I'd implement the certificate system in this sequence:

  1. Certificate Templates – design the professional certificate layouts.
  2. Firebase Certificate Collection – store certificate records.
  3. Admin Certificate Generator – issue certificates manually.
  4. Student Certificate Dashboard – display earned certificates.
  5. PDF Generation – enable downloadable certificates.
  6. QR Code & Verification – allow public authenticity checks.
  7. Automatic Certificate Issuance – generate certificates after course completion.
  8. Email Notifications – deliver certificates automatically.
  9. Analytics Dashboard – monitor issuance, downloads, and verification.

This approach lets you test each piece independently while steadily building toward a fully automated digital credential system.

how do i go about this Phase 1: Database Design (Firebase) Create a certificates collection.

This is a great place to start. Since your Galaxy EduCore project already uses React + Firebase, creating a certificates collection in Firestore is straightforward.

Step 1: Open Firebase Console

  1. Go to your Firebase project.
  2. Select your Galaxy EduCore project.
  3. In the left menu, click Firestore Database.
  4. If you haven't created a database yet:
    • Click Create database.
    • Choose Start in test mode (for development).
    • Select your preferred region (choose one close to your users).

Step 2: Create the certificates Collection

  1. Click Start collection.
  2. Collection ID:
certificates
  1. Click Next.

Step 3: Create the First Certificate Document

You can either let Firestore generate the document ID automatically or use your own.

For now, let Firestore generate it.

Then add these fields:

FieldTypeExample Value
certificateIdstringGEC-2026-000001
studentIdstringSTU001
studentNamestringKay Daniels
studentEmailstringkay@example.com
courseIdstringCSC112
courseNamestringHTML & CSS Fundamentals
instructorstringDr. John Doe
completedOnstring2026-07-20
issuedOnstring2026-07-22
expiryDatestring(leave empty if none)
durationstring8 Weeks
gradestringA
scorenumber96
statusstringIssued
verificationCodestring84JSHD9928
qrCodestring(leave empty for now)
certificateUrlstring(leave empty for now)
downloadsnumber0
templatestringdefault

Your Firestore document will look conceptually like this:

{
  certificateId: "GEC-2026-000001",
  studentId: "STU001",
  studentName: "Kay Daniels",
  studentEmail: "kay@example.com",
  courseId: "CSC112",
  courseName: "HTML & CSS Fundamentals",
  instructor: "Dr. John Doe",
  completedOn: "2026-07-20",
  issuedOn: "2026-07-22",
  expiryDate: "",
  duration: "8 Weeks",
  grade: "A",
  score: 96,
  status: "Issued",
  verificationCode: "84JSHD9928",
  qrCode: "",
  certificateUrl: "",
  downloads: 0,
  template: "default"
}

Step 4: Update Your Firebase Configuration

If you already have a firebase.js file, make sure it exports Firestore.

Example:

import { initializeApp } from "firebase/app";
import { getFirestore } from "firebase/firestore";

const firebaseConfig = {
  // your Firebase configuration
};

const app = initializeApp(firebaseConfig);

export const db = getFirestore(app);

Step 5: Create a Certificate Service

Create:

src/services/certificateService.js

Add the following:

import {
  collection,
  addDoc,
  getDocs,
} from "firebase/firestore";

import { db } from "../config/firebase";

const certificatesRef = collection(db, "certificates");

export async function getCertificates() {
  const snapshot = await getDocs(certificatesRef);

  return snapshot.docs.map(doc => ({
    id: doc.id,
    ...doc.data(),
  }));
}

export async function createCertificate(certificate) {
  return await addDoc(certificatesRef, certificate);
}

Step 6: Test Reading Certificates

In your Certificate.jsx page:

import { useEffect, useState } from "react";
import { getCertificates } from "../services/certificateService";

const [certificates, setCertificates] = useState([]);

useEffect(() => {
  async function loadCertificates() {
    const data = await getCertificates();
    setCertificates(data);
  }

  loadCertificates();
}, []);

Now, instead of using a hard-coded array, your certificate cards can display live data from Firestore.


Recommended Firestore Structure

As your application grows, a structure like this will scale well:

Firestore
│
├── users
│     ├── userId
│
├── students
│     ├── studentId
│
├── lecturers
│     ├── lecturerId
│
├── courses
│     ├── courseId
│
├── assignments
│     ├── assignmentId
│
├── submissions
│     ├── submissionId
│
├── certificates
│     ├── certificateId
│
├── badges
│     ├── badgeId
│
├── announcements
│     ├── announcementId
│
├── supportTickets
│     ├── ticketId
│
└── resources
      ├── resourceId

This organization will make it easier to manage data as you add features like course registration, Turnitin integration, support tickets, and digital credentials.

What I'd build next

Before generating PDFs or QR codes, I'd create the Admin Certificate Generator. That page would let an administrator select a student and a completed course, then click Issue Certificate to create a Firestore record. Once that workflow is working reliably, we can add automatic PDF generation, QR codes, and public certificate verification on top of it.

VERCEL DEPLOYMENT

  Hobby (Free) Plan You can have up to 200 projects (websites/apps) under one account. Each project can have its own: Production deploy...